Whiplash Dangers of Drops

Written by McKell Anderson

While receiving a lovely massage that my husband gifted to me for Valentine’s Day, my therapist began asking me the usual questions:

“Do you have any problem areas?”

“What areas would you like me to focus on most?”

“How do you like your pressure?”

My answer:  “Please destroy my shoulders with all the force an invading finger army can deliver.”

So far, pretty normal experience for most aerialists getting a massage.   During the massage, the therapist moved to my chronically tight neck and she was surprised with how tense it was.

Masseuse: “Have you been in a car accident recently?”

Me: “No, my neck is usually tight like this.”

Masseuse: “Your neck feels like people I work with that have had whiplash.”

The wheels in my head began to turn with that statement.  I was in a car accident when I was seventeen but that was fifteen years ago and I did not experience any severe whiplash from it.  However, I commonly let my body gracefully–and sometimes not so gracefully–fall towards the ground until a piece of fabric halts my descent in a rather abrupt manner.  The curiosity seed was planted:  Can aerial drops give someone a whiplash injury?  Has it given me whiplash?

Now, let me start by saying that I’m a firm believer that correlation does not equal causation.  Just because things seem to relate, does not mean that it is truth.  You should know that despite my supplications to the oracle that is Google, my canoodling on aerial forums asking around, or my general inquiries to my aerial role models, I couldn’t find any existing data on the idea.

Aerial is still a young industry, so having scientific data collected on many practitioners is highly unlikely.  Data not existing doesn’t necessarily mean that there isn’t a correlation; it could just be a sign that no one has researched it yet.  For the remainder of this post, we will go over what information we DO have on whiplash injuries and aerial drops separately, then compile the information into some helpful guidelines for safe dropping. If you ever come across any research on this topic, I’d love to be the first one you share it with! Much appreciated.

A Crash Course on Whiplash (no pun intended)

“Whiplash is a mechanism of injury due to forceful, rapid back-and-forth movement of the neck, like the cracking of a whip. The energy transfer of the rapid acceleration and deceleration forces to the neck can result in damage to the soft tissue structures of the neck.”  -Dr. Emily Scherb

Most of the observations made about whiplash relate very specifically to car accidents.  Whiplash injuries are kind of a fickle thing and vary by individual.  Some people experience a little pain for a few days but make a full recovery with very little side effects in a short time.  Others do not notice any symptoms until many weeks after the accident.  The unfortunate thing is that the longer the symptoms persist, the more likely that the damage will become permanent.

Symptoms following a whiplash injury may not be what you would normally anticipate.  When you think of whiplash, the normal expectation of symptoms would be tender muscles, limited neck mobility, headaches, and upper back pain.  Other symptoms can be a bit sneakier like shoulder pain, anxiety, fatigue, sensitivity to noise, impaired concentration, or temporomandibular joint disorder (TMD/TMJ) resulting in jaw pain.

I’ve observed (and that doesn’t make this a fact) that TMJ pain is more pervasive in the aerial communities I’ve been in than any other groups I’ve associated with.  Could be a coincidence but might not be.  Only time and data will tell.  There are various factors that can increase the likelihood of getting whiplash in an accident.  Some of these facts I found interesting when analyzing them with aerial in mind.

  • The threshold for soft tissue injury is five miles an hour. Vehicles do NOT need to be going fast to cause the most severe kinds of whiplash.
  • Rear end collisions can be the most severe because the torso is the most secured by the seat belt and the neck can move freely. So instead of the entire back being able to absorb the force, most of the energy is transferred to the neck alone.
  • Position of the head during the collision is also a critical element for injury severity. If the neck is not in a neutral position, say while you have your head slightly turned to adjust the radio, then the available range of motion is greatly diminished. This will result in the force of the collision being localized to one side of the spine.
  • Awareness of impending impact is also a factor. If an individual can brace themselves for the collision then their ability to effectively stabilize during the accident increases.  Studies have shown that passengers experience greater whiplash injury than the driver, often because they are less aware of the situation.

Aside from all the potential factors DURING an accident, there are even MORE chances to impact whiplash with the human body.  Since no two bodies are identical, here are some of the physical considerations in assessing whiplash risk.

  • Muscles, ligaments, and other tissues help absorb shock to the body without causing injury. Individuals that are physically fit and in a good health condition will be more efficient in stabilizing severe forces to the body.
  • Strength needs to be balanced on both sides of the body. Uneven muscle development in the back can result in the spine being in a less ideal posture during collisions or unable to stabilize evenly during an accident.
  • Body type can put certain individuals at risk. Those that have smaller frames, longer necks, and less supporting muscle mass have an increased risk for whiplash.  Women are statistically twice as likely to be injured than their male counterparts.
  • Small children can also have a proportionally larger skull in comparison to their neck and less muscle mass to compensate for it, making them prone to injury.
  • Older populations also have a great injury risk due to the natural degeneration of human body as it ages. “Ligaments become less pliable, muscles less flexible, and the bones, joins and discs less able to absorb impact without injury.”
  • Good body mechanics is also helpful. Individuals that train to have coordinated control over muscles and joints, engaging in the right order with the right tension, will be able to stabilize their body with less mechanical stress and pain.

Drop Mechanics

There seems to be a time in a lot of aerialists’ lives where drops are “the end all, be all” of their hearts desires.  While I don’t think this is true myself, my entire third year of practicing aerial was spent consuming all the drops I could get my greedy little hands on.  So, I’ve BEEN there and I understand the draw.  If drops are what you want, then I hope this will help you understand what to anticipate and make the process as pain free as possible.

First thing to address, drops cause force!  Lots of it.  While you might be an aerialist somewhere between 100-200lbs, with the additional forces we add by embracing gravity abruptly, the true force (or shock load) can end up being around 1,000 pounds.  A general rule of thumb is that 1,800 pounds of force can cause a person to black out and bleed internally.  This should be avoided!  HOWEVER, that’s not to say that injuries cannot occur to our persons with less force than that.  Let’s look at the shock load formula to help further our discussion:

shockload

W = Weight of Aerialist

Df = Distance Falling

Ds = Distance Stopping

In this formula, the most important relationship to pay attention to is the falling and the stopping distance.  Since it is a fraction, everything you solve for begins here and SHOULD likewise be what you notice when learning drops.  (Who says math and real life don’t intermingle?) If you are falling a large distance and stopping abruptly, you will create larger amounts of force.  In aerial, we very often choose to fall large distances on purpose, but if we want to reduce the impact to our bodies we need to pay attention to how we can increase stopping distances to help provide a physical reprieve.

Stopping distance is a hard thing, here are factors that can impact the stopping distance:


The Type of Drop Chosen.

I know, duh.  Some drops have more freefall time that happens and others are more of gravity guided unwrapping, think slack drops versus star drops.  Drops can also vary on how many wraps will tighten at the end to help slow us down more gradually.


Equipment Choices.

Depending on the apparatus, there are choices an aerialist can make to help the equipment absorb more shock by stretching during impact. Think of high stretch or low stretch aerial silks, bungee packs added to the top of rigging, or ropes with stretch used for pulley systems.


What Part of the Body the Drop Culminates On.

I don’t know about you, but my thigh has a lot more “squish” available than my ankle does.  Dropping to meaty regions versus boney regions will have different comfort levels and stopping distances.


FORM!

If you have been waiting for the moment where we address the physical capabilities needed, now is the (first) moment.  The human body is made up of muscles, ligaments, and tendons that are great at absorbing shock and impact.  This ONLY happens when proper strength and engagement are available.  MORE ON THIS LATER!

There are specific instruments that can measure shock load (dynamometer) and these often show the calculated estimation to be higher than reality.  Why the discrepancy?  Many of the above factors are very dependent on the human body and are not the same from individual to individual.  Even in one person, your day-to-day ability to absorb the shock of drops will not be the same.  Muscle soreness and stiffness will inhibit your body’s abilities to absorb the shock load of drops.

How to Drop it like it’s Hot (Safely)

From the discussion so far, we know that whiplash is caused by a rapid extension and flexion.  We know that it often happens in accidents of low speeds.  We know aerial drops can create a lot of force on the human body.  I’m going to go out on a limb and conclude that whiplash in aerial is a real possibility.  How often or how severe?  I couldn’t accurately guess, but it IS something we need to be mindful of in our practice.

“Incorrectly wrapped or executed drops can result in sprains, whiplash, burns, and broken necks. You don’t get to be cavalier about them. Respect the risk, respect the work, respect the process, respect the community.” – Laura Witwer

Most importantly, based on reviewing this information, I feel that there are easy practices to put in place to help mitigate the risk for whiplash or other injuries while performing drops.  Check out the list and let me know if there are more things you would recommend:

1:  Strength First, Drops Second

There is a terrible habit in aerial of attempting drops before the body is strong enough to support it.  Having the appropriate strength along the spine is a key element in the body being able to execute drops safely and gracefully.

“With any particular drop, an untrained artist would be more likely to have a whiplash type injury than someone who has trained up to that level because the trained performer has more strength and control in their paraspinal musculature and can withstand more force and load.” -Dr. Emily Scherb

Flailing form is usually the result of an aerialist attempting something they aren’t strong enough for and flailing is how we get injured.  The lovely and eloquent blogger, Laura Witwer, just wrote a wonderful blog about assessing the readiness of an individual for drops (link at the bottom).  Use discernment when deciding to learn aggressive drops and ESPECIALLY when to teach them to others, specifically children with their proportionally large developing domes.  They aren’t party tricks friends!

2:  Neck Engagement – Embrace the Jabba Chin

One of the factors with whiplash was related to seatbelts restricting torso mobility which resulted in the neck taking more force than desired.  If you are engaged in your core for a drop, but your head is loose like a bobble head doll, then your neck is in danger!  When executing drops, it is important to have your neck engaged along with the rest of you.

The Jabba Chin is the practice of engaging your neck so that your chin drops and pulls in just enough to feel a little bit of pressure on your windpipe.  Your jaw should not be clenched.  Don’t give yourself a genuine double or triple chin, because we will still want to look sexy while we do things.  Keep your neck position neutral during the drop and wait to fully extend or arch until the end.

3:  Train Both Sides

Your bodies ability to absorb shock appropriately depends a lot on having a balanced muscular system.  If you constantly only train one side, then your body will lose its ability to evenly react to force and will make you prone to injury during those critical moments.  I know some people do not drop on their offside for safety, which is not the point I want to make here.  Aerialists need to be able to climb on both sides, invert on both sides, hip key on both sides, meat hook on both side… All your aerial foundations should be as ambidextrous as possible so your body is balanced.

4:  Coordinated Engagement Practice

The key to good execution isn’t just tensing all your muscles at once.  We need to make sure we are engaging muscles in the correct order and with the right amount of tension, because if we do not it will increase mechanical stress and pain of what we are trying to accomplish.  Aerial is hard enough, no need to make it harder by over engaging, like with clenching your jaw for any reason or being too tight when attempting beats.

There could also be a different type of engagement needed for certain things.  For some drops, it is important to engage the abdominals by ‘pushing out’ to protect the ribs instead of ‘pulling in’.  Practicing drills like scorpion/sacrum falls will give the body a chance to learn how to fall and engage in the appropriate order to make bigger drops easier and more intuitive.

5:  When in Doubt, Walk it Out

Pro Tip:  The first time you do a drop you should always have doubt.  Meaning that the first time you try a drop you need to walk through the exit/drop instead of just going for it.  Your body has never done the trick and cannot understand what will happen.  Having a method to walk out of a drop is important because it teaches the body what to expect.  Being able to anticipate what will happen helps the body engage in the correct way to protect itself.  Much like the driver of the car being able to prepare for impact better than the passenger, you need to understand what is coming before you do a drop “full out”.  You don’t want to do a drop as a passenger, you need to be the driver.   This is even more important if you are attempting a drop that has a direction change, lest your head channel its inner pinball machine.

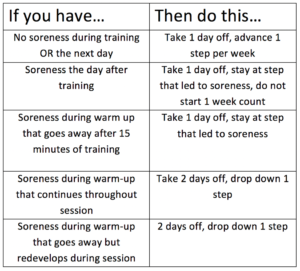
6:  Avoid Drops When Sore

Another way the body will lose its ability to absorb shock is when it is fatigued.  If you have been overtraining and are sore, then your muscles will not be able to support you like they would on days where you feel like a spry young pup.  Save your drops training for the days that your body can handle it safely.

7:  Designated Drop Equipment

Where possible, try to have a rigging point set up with equipment that is drop friendly.  Put a stretchy fabric up or have a point that has a bungee pack on it.  When learning any skill, repetition is key to mastery, but repeating aggressive drops can be daunting and painful.  Having a set piece of equipment that helps mitigate the stress when practicing is helpful on the body.

8:  Learn Drops with Coaches

While this is not a conclusion being made from the analysis on the whiplash data, this is of equal importance. Recently Brandon Scott, an accomplished aerialist, published a rant on the dangers of learning from Instagram.  I really loved what he had to say:

“Drops are the flashiest part of aerial. They are dynamic and exciting, their impact makes them almost necessary for the climax of an act, and when they are done right, they are just plain fun to do!!”

But did you catch that caveat? ‘When they are done RIGHT’. There is a large range of how difficult or technical drops can be. But at any level, drops are part of what makes aerial dangerous. While ‘death defying’ may be used as a descriptor to pull in an audience, we as aerialists need not consider death, let alone defy it, if we have all the information and preparation for safe execution.” -Brandon Scott

Preach Brandon, preach!

Good aerial instructors will give students the information they need to successfully execute a drop without injury.  A lot of times success is achieved through a series of progressions that aren’t ever shown during a performance or on an Instagram video.

Drops will forever be a huge part of aerial and they are a wonderful tool, but aerialists need to take the time to learn them safely and appropriately.  Hopefully the content of this blog will help you in your endeavors to gain more information and help you do amazing things more safely!


Congratulations!  You made it to the end!  Share your thoughts below!


Resources:

https://treatmentforwhiplash.com
https://www.lifemark.ca/blog-post/understanding-whiplash
http://www.laurawitwer.com/2018/04/11/pardon-sir-madam-not-ready-drop/


Everything Hurts and I’m Dying: How Much Soreness is Too Much?

Authored by Dr. Jennifer Crane, PT, DPT, OCS, ATC of Cirque Physio.

What does current performing arts culture tell us about muscle soreness? Aches and pains? Bruises, burns, and rope rash?

“CIRCUS HURTS.”
“Train through it.”
“Tears are for home, not circus”
“Here, have some circus candy (advil/ibuprofen).” 

These are all common “circus-isms” that I’ve heard, and I want to talk a bit about soreness- is it productive? How much is too much? How do you train optimally while simultaneously avoiding OVERtraining and subsequent injury?

This is a HUUUGEE topic, and I’m only going to address a small component of it in this post.

​I was recently reading an article on implementing pitch counts in little league players (woah, #notcircus?! I know…what was I thinking…) and it REALLY got my gears turning. Not because I love baseball (…I don’t), but because one of the criteria they used for progressing pitch intensity and frequency was something I felt could also be applied to circus artists who are returning to training after a long hiatus, or even to those who are wanting to progress skill and strength levels in an efficient amount of time, without getting injured.

THE SORENESS RULE

​This criteria for training progression is referred to as the “Soreness rule.” It was initially created for pitchers, but has since been adapted and modified to fit other sports as well (running, weight lifting, etc). These rules give athletes the ability to modify their progression of skill/strength according to the soreness they experience. If the athlete feels sore, tender, or stiff, then they can use the soreness rules to guide their training for the rest of that week.

BUT FIRST…

​Here are the ground rules before I dive into WHAT the actual soreness rules are:

  1. THESE DON’T APPLY IF YOU’RE INJURED.  If you have pain that is NOT from working out a muscle, GET IT CHECKED OUT by someone who’s qualified to do so.
  2. These rules are based on stepwise progression of overall training volume, strength or skill acquisition. This means that before you get started, you need to create multiple steps/phases of training- whether its breaking a trick down into 5 phases, or just generally increasing the number of hours you train per week. For example: if you’re an aerialist that is coming back from having a baby (and have been cleared to return to aerial by all involved healthcare providers), you should first sit down and create a multi-phase return-to-full-time-aerial plan. This must be well defined, so work with a qualified coach to do so, if you get stuck!
  3. Ok, sit down for this one…I’m serious, you’re not going to like it. EACH TRAINING DAY SHOULD HAVE ONE DAY OF REST BETWEEN to ensure proper recovery and adaptation to the stimulus and load!!
    1. Yeah, I said it. The “R” word. In this context, it doesn’t mean complete Netflix and chill bedrest status for 24 hours, it just means that if you’re working on an upper body skill, to give your upper body a break the next day. Yes, handstands count. Yes, contortion counts. Yes, vinyasa yoga counts. Yes, one day = 24 hours.
  4. Each step/phase in your progression should last for at least one week. This means that you should be working on whatever conditioning/training drills comprise ONE step for SEVEN DAYS- without soreness. You must be able to do step one, completely free of any muscle soreness, for 7 days before progressing to step 2. If you have soreness during step one, you stay on step 1 (with 24 hour break between each training session) until you’re doing it WITHOUT soreness. For 7 days.
    1.  I do realize I just said the exact same thing three times. I’ve had the rest day conversation with enough circus artists to know that repetition is key, and over-defining each term is required. It is also often required for me to define how many hours are in a day, and how many days are in a week. 

CLIFF NOTES VERSION

 ​Overwhelmed? Here’s the cliff notes version: Pick a skill to work on, or an overall training goal. Break the goal down into at least 5 steps. Assign drills and conditioning for each step. Start with step 1, and don’t move on to step 2 until you’ve been doing it every other day for one week, without any muscle soreness.

Oh yeah…one more thing. WORK WITH A QUALIFIED COACH.

​PRESENTING: THE SORENESS RULE


YOU’VE GOTTA BE KIDDING ME.

Alright, there we have it. The rules. You guys, I KNOW. Your heart rate and blood pressure just spiked, and you’re getting anxious just THINKING about all those rest days, and how slowly you think you’ll progress. I’m aware that in the circus world, these rules seem SUPER conservative.

​However…as a circus PT, at least 80% of the injuries I treat are from overuse…too much training, and too little rest. These injuries tend to last upwards of 3 months (because again, no rest…) and can significantly impact performing artists career length and career quality. The kicker is, these injuries are caused predominantly by modifiable risk factors…aka, proper dosage of training and adequate rest. So yes…I understand that you’re panicking thinking about this. And yes, I understand that implementing any big change in training program is something that does NOT happen overnight, but I think these rules have a potentially huge positive impact on the overall rate of overuse injuries in circus artists, and I think there’s value to planting this seed in your minds…even if you don’t actually DO anything about it for a while!

As I said, the topic of adequate rest, proper training load and volume, as well as overall periodization of training in circus arts is a MASSIVE subject. I’ll likely have a few more posts on this topic, so if you have any specific requests, leave them in the comment section!


DR. JENNIFER CRANE, PT, DPT, OCS, ATC

Dr. Jennifer Crane is a physical therapist, athletic trainer, board certified orthopedic specialist, and published author. She has been a sports medicine professional for eight years, and has worked with a wide variety of athletes and performing artists throughout that time. Most recently, she worked as a physiotherapist living in China with the Chinese Olympic Teams in preparation for the Rio 2016 Olympics. While in China, she worked with multiple sports teams: diving, weight-lifting, fencing, gymnastics, synchronized swimming, and track and field. Of the athletes she worked with, 18 of them went on to get an Olympic gold medal in Rio.

Now happily back in San Francisco, Jen’s practice is based at Circus Center, where she specializes in injury prevention and treatment of athletes and performing artists. When she’s not working with circus artists, she can usually be found standing on her hands, swinging on flying trapeze, or spinning on a single point trapeze.

Click here to visit Cirque Physio.

How to Be Judgmental When You Enter a New Studio

Sometimes, it’s a good thing to be judgmental. Particularly when your well-being (and maybe your very life!) depends on it. The goal of this blog is to give you practical tools so that when you walk into a studio, you can make a call for yourself: Is it safe to do aerial here? Unfortunately, sometimes the answer will be NO! It pains me to say it –because I want to believe the best from every human being and every studio–but some people have starting teaching aerial before their safety wisdom has ripened. Stay away from them bad apples.

First — Look Up & Ask Questions

Whatever the rigging is attached to should be able to handle the load capacity for EVERY point that is in operation that day doing aerial things. Here’s a great video to show how a drop can generate 900 pounds in a split second!

How safe are you going to feel on a system that is designed to hold 1,000 pounds? Um, let me answer that for you: back away slowly. OSHA recommends a safety ratio of 10:1, meaning that ideally, the system should be able to handle 9,000 pounds if you are going to be putting 900 pounds on your system. Now, generally, 5,000 pounds is acceptable in the aerial world for each rig point, but hey, higher is always better and safer!!!

Look at what you are hanging from. If you are unsure about anything, ASK QUESTIONS! Don’t be afraid to ask questions. If the owner is insulted, this is a red-flag! Any studio owner who has put years of research into best practices and thousands of dollars into safety is proud to talk your ear off about why their system is super safe, and how the engineers backed up their load capacity numbers well over 5,000 pounds. They didn’t just take some shady chain and loop it around the nearest trussing. (In general, aerial riggers recommend staying far away from chain. It is unpredictable in load capacity around beams and not suitable for most aerial rigging.)

Look at the Attachments

The big beam holding all your weight should look and feel sturdy. Next, we want to draw your attention to all the attachment points. If carabineers are being used, are they closed and locked? Are carabineers turned sideways or tri-loaded? Here’s an example of a carabineers that should NOT be used EVER for aerial work:

carabineer

I have seen cases of the above being used for aerial hanging. I would use this carabineer to hang my keys in my purse, not to hang my life. It’s a fine carabineer for other uses, but NOT rated for aerial. It’s working load limit is a dinky 180 pounds.

While many aerial riggers have a preference for steel carabineers, this is not law, and aluminum is okay, as long as it’s one that is rated for a minimum of 2,000 pounds (again, higher = better). Some red flags to look for no matter what carabineer is up there is side-loading. Side-loading a carabineer is a big no-no. A carabineer has different ratings based on how it is loaded and the best (not to mention safest!) is to always double check your rigging to ensure that carabineers are in their normal vertical positions.

Another no-no when it comes to carabineers is leaving them unlocked or unscrewed. This is a no brainer, but I see it happen a lot with new/less experienced riggers! No leaves it open on purpose, everyone can be forgetful. That’s why I teach my teachers that they have to go “clickity-click-click-it” every time in an annoying — but helpful for memory — way.  Having a routine that requires you to double check everything helps to avoid simple mistakes.

Screw-gate carabineers should “screw-down so you don’t screw up!” This helps for long-term safety as gravity can unravel a carabineer.

Another no-no for carabineers is tri-loading. I see it all the time, but it’s not how a carabineer is supposed to be used. It shouldn’t be done! Here is a great video from Vertical Art Dance (highly recommend their equipment and rigging services) that discuss this topic and more:

Thank you Vertical Art Dance for spreading aerial knowledge!

Tragically, this past year, Sam Panda was in a rigging accident and broke her neck from 13 feet up. I post the following video only to encourage everyone to seriously consider the consequences of faulty rigging. Thankfully, Sam Panda was generously supported and funded by the aerial community to support life-transforming surgeries and she is recovering just fine!

Warning: The following video displays the fall and may be hard to watch.

Look at the Equipment

Recently,  I visited a studio where the fabric had a ton of holes in it.  It was a high-volume, high-use studio, so it was a natural part of the game. Thankfully, it was run by teachers who knew how to conduct proper inspections of equipment. For small holes, the holes were sown up, sealed, and marked with permanent black marker. If the holes got too big or grew, then the fabric was retired. Everything was kept track of, which is an important part of running a large operation. I’ve heard all the stories including wooden bars of a trapeze breaking when someone landed with a little extra force (wooden bars are no longer used for general aerial classes), lyra breaking, rigging splitting and coming down, ropes untying, and more. You name it, I’ve probably seen or heard of it happening. Better safe than sorry. Old equipment should be retired. New equipment should be bought from trusted vendors.

Look at the Mats

First of all, make sure that mats are present!!! While mats cannot guarantee protection, they are sure going to help. When it comes to mats, aerialists prefer ones that are at least 8 inches in thickness. As always, the more, the merrier. The thicker, the better. The wider, the safer. Some mats are pretty dinky, making a small target to hope that your head lands on when you are swinging around 10 feet up. Look for generous sizes and that they are used WHENEVER possible. There is no reason to leave the safety of mats when learning new moves. Some cases are exempted when the performer becomes advanced and wishes to incorporate ground choreography and the mat gets in the way. But, this is an exception. The rule should be that in all general aerial classes, especially those were the participants are learning new moves and their feet are leaving the ground, there should be mats. And not just some thin, dinky thing that does nothing. A good, sturdy, solid mat. It’s a display of caring about the students and the studio.

Look at the Teaching Methods

The big things we are looking for here is warm-ups and proper progressions. Just holding some stretches is not a warm-up. You must do something that builds heat in the body and then you must get mobility in the joints through any variety of methods. More on great warm-ups can be found on a previous blog here.

When we look at the curriculum, what we are looking for is how assessments are made, and how moves are ordered. If day 1 for a new fabric class is cross-back straddle, this is a problem. This may have been the first move 10 years ago, but there has been a ton of progress in aerial education since then! It is now understood that cross-back straddle can be a very difficult move for many beginners and that proper care must be taken to build up the strength required for its proper execution. It goes hand-in-hand with straddle inversion strength which should be assessed for before a student works at this level. (There are always exceptions. You may have a strong gymnast who can handle a cross-back straddle in a private lesson on their first day on fabric. However, even in this case, we would assume that strength was assessed and that they are skipping levels only because strength was assessed and they passed. We are addressing the general rule of thumb for classes to the general population.)

Many aerial teachers of today are aerialists who learned fast and learned many advanced moves early in their training. When they go to teach beginners to today, they often are at fault for teaching the same moves that they learned first. Many students are not ready to go that far that fast. The more that aerial grows, the more we must grow our depth of beginning programs and beginning material because we are attracted more and more people from non-gymnastics backgrounds who may take quite the journey to find their inversion strength. We must offer them the proper strength-training regime so that they are building strength safely and slowly.

If a studio lets you learn drops on day two, this is a huge red-flag!!! Drops are the candy of aerial, and some studios think that by letting people learn them, they will be a booming aerial business. I’m sure they will, but they will also have a booming business with the nearby rehabilitation center. Drops and other high-level candy of aerial must be earned through proper progressions and body awareness growth. If you go a studio and think “This is too easy and low to the ground,” you’ve probably found a SAFE studio. Don’t worry — you’ll eventually be flying. No one is out to keep your wings clipped. Safe instructors are there to prevent you from jumping out of the nest before you have strong wings period.

Trust goes both ways. A students must trust the studio and the studio must trust the student. A studio can only trust the student by giving them one small task at a time to see how they handle it. If you are flailing at 2 feet off the ground they shouldn’t trust you to go 10 feet up. You shouldn’t get to fly 10 feet up without demonstrating you are trustworthy first. You may feel like your being babied at the beginning, but as long as you see other students who are flying high at the studio, stay with them. Once you pass the assessments and show you have the proper strength and control, you will benefit from their progression training. You will soon find yourself SOARING HIGH with wings that have been molded and chiseled in a way that only diligent training time can give you.

Some things to look for: When you train too hard too fast, your elbows will start hurting you. This means that you are putting too much weight on bent arms without first building up the strength in increments. A good instructor will have the answer to this right away. If not, e-mail me and I’ll send you my program to help prevent this and heal in the next couple weeks!!!

For parents, it is important to note that your child should not be practicing footlocks without first being assessed for proper ankle strength. When a child does too many footlocks without having firmly established ankle strength, they are at risk for deforming their growing bone structures. We have seen studios break out with an epidemic of foot problems due to having young students (under 12) on footlocks, and allowing them to sickle, not watching for strength or body awareness. Anyone can teach a footlock and a basic leg roll-up. Few people know exactly when and how to properly teach it.

As you can hopefully tell, I’m extremely passionate about proper teaching methods. That’s why I started the Born to Fly Teacher Trainings & Support Systems for teachers. While I do not believe that every teacher should be trained under our system, it can be a powerful tool out there to help raise the standard for aerial education. When looking for an aerial teacher, you can check on their certification at the following link: http://www.borntoflyaerial.com/certificate-holders.html

We have had people falsely claim to be Born to Fly Certified when they were not. It is always good to check on certifications. No one who is certified will mind. Quite the contrary. The will be overjoyed that you value their hard-earned certificate!

One last important note:

Our studio directory on this website does not endorse the listed studios, nor can it vouch for the safety or training methods at the various studios. Please become as educated as you can and start asking all the right questions as you enter a studio, listed in our directory or elsewhere. Be safe and happy flying!