Top 10 Items You Need For At-Home Aerial Workouts

About 6 months ago, two things happened to me:

(1) I got a shoulder injury.

(2) My studio grew so much that it felt like I got kicked out of it. For the first time in our 4 year history, I wasn’t teaching any classes (or if I was, a student-teacher was doing all the demoing), and the rare times I came in to maybe train, I was inundated with studio-owner questions, or found the studio occupied during what used to be my “self-training” time and needless to say, training for me just wasn’t happening.

All that to say, over the past 6 months, I have become REALLY good at working out at home. So, when this whole stay-at-home-due-to-Coronavirus-shut-down happened, I got inspired to write my first blog in almost a year! (Fun fact: this is the 98th blog on this website — only 2 more till 100)!

In this blog, I’m going to share with you my TOP 10 LIST for at-home training equipment that I feel is necessary for quality home workouts.  I’m secretly hoping to convert into a lifer — someone who continues to have a home workout practice even when your access to aerial equipment returns. Because I will let you in on a shocking truth — I’m not strong because I do aerial. That may be part of it, but I could aerial all day with bad form and lazy technique. I’m strong because aerial motivates me to work hard in my home workouts, and those take place apart from my aerial technique training. It’s the reason I can walk into the studio and impress my students with 10 seconds of cold hard-core aerial any time of day.  I work hard to stay in such good shape that their hardest workout doesn’t even phase me.  Take that! (Although I have some students catching up to me now…just sayin.)

I’ve heard it said it takes 30 days to set a new habit, so join me in making this your new thing for the coming month. Start a new habit and see results that might surprise you when you return to the air!

Home Workout Item #1: A Blank Calendar

Print out a blank calendar. Write down your workout each time you train and take notes on what body part is your focus. If you come across any weakness that you need to work more on, write it down.

Example: https://www.vertex42.com/calendars/printable-calendars.html

Keeping track was one of the best things I could have done. Why? It’s like giving myself a high five for doing the workout. Getting to write down that I worked out helps me to feel accomplished as much as the workout itself. I recognize training gaps or am reminded that it’s been a while since I’ve worked my back and need to target that once again, etc.   If I identify any weak areas, I focus on them in my workouts and train in appropriate periods of rest and recuperation to allow for my muscles to grow and adapt.

Trust me. Just do it.

Home Workout Item #2: A Pull-Up Bar

Link to one from Target. 

pull up bar

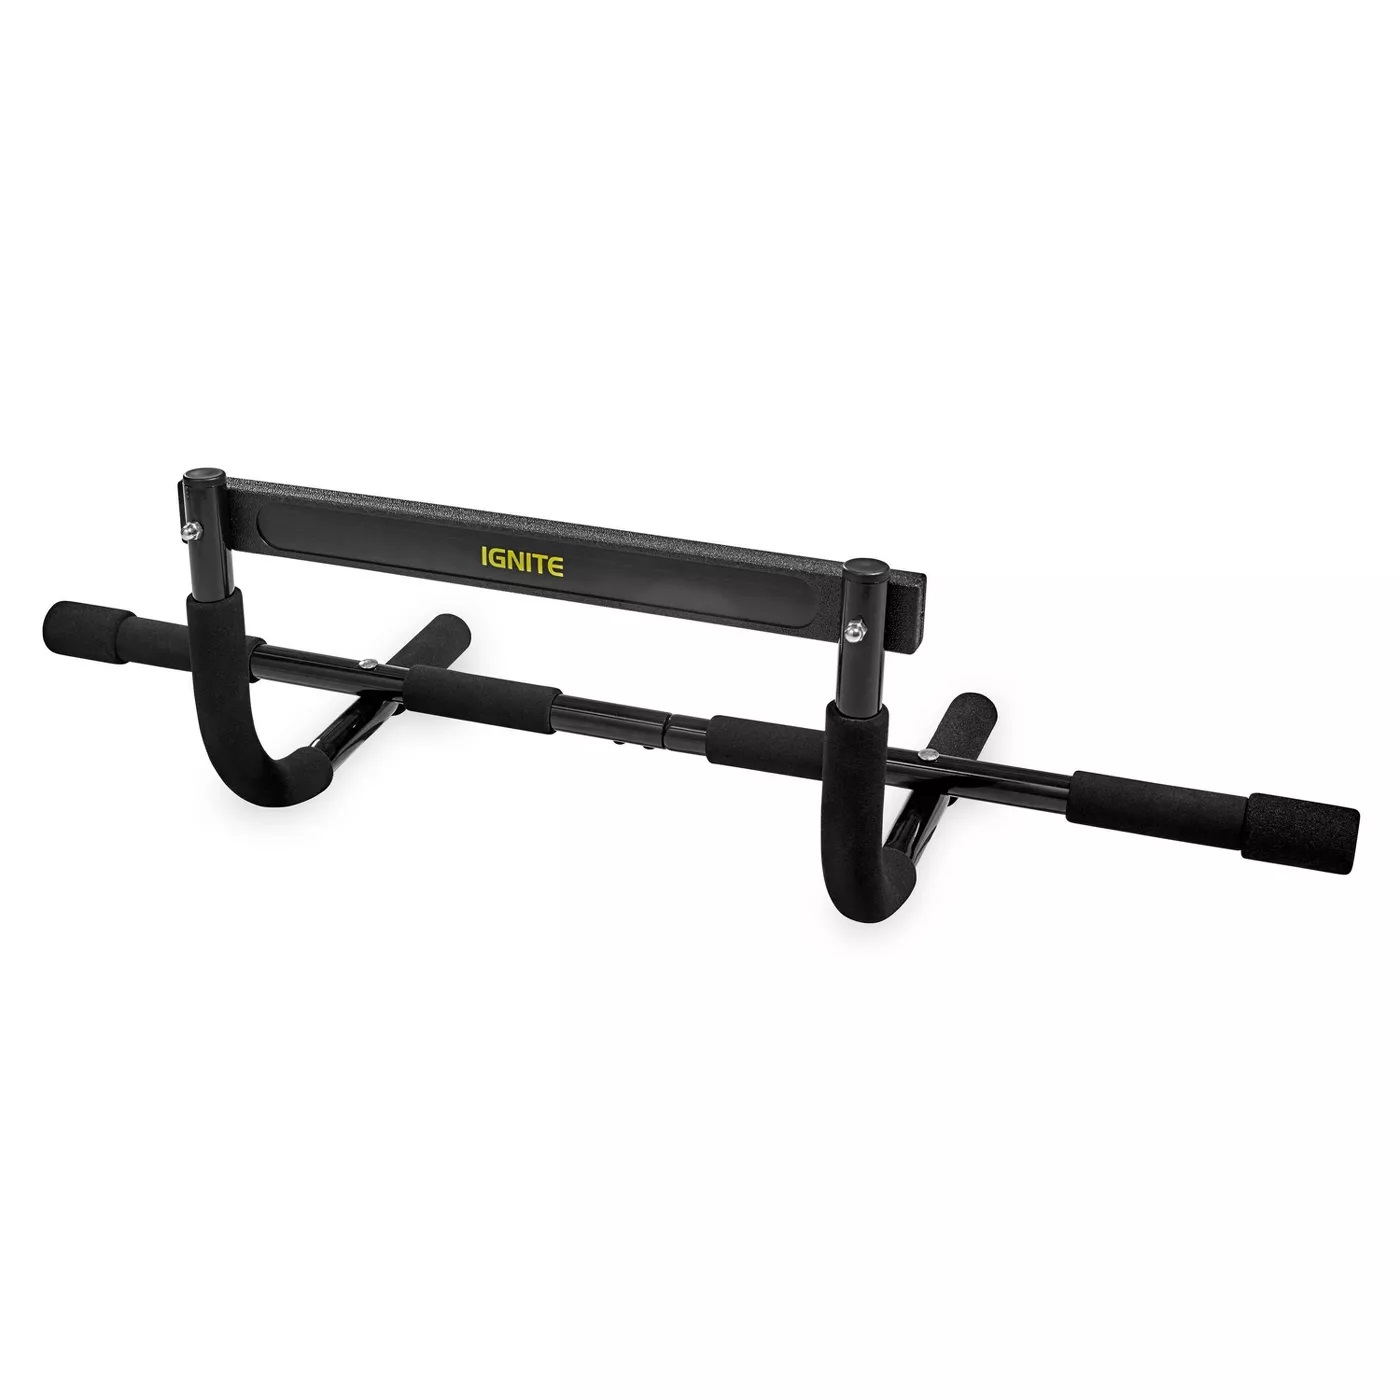
Tip: I like the one (like link above) that you can hook over the door and doesn’t need to be drilled into the wall. If you’re worried about the pull-up bar leaving marks on the doorframe, add a towel underneath it for extra cushion between the bar and the door. 

If you’re looking for aerial strength-training, you need to be doing pull-ups, and it’s really hard without a pull-up bar. So just get one. Thank you.

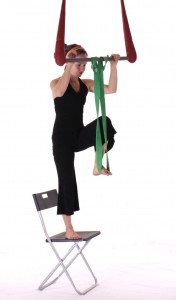
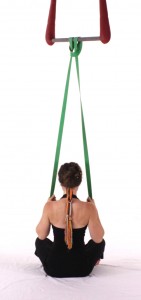
Home Workout Item #3: Pull-Up Assist Bands

Link to bands from Walmart.

pull up assist bands

These are thicker than your typical resistance bands (which you need and are next). These are going to help you per-fect your FORM which needs more work than you think. If your pull-up looks like your trying, then you are aren’t trying hard enough. You pull-up should be so well-executed that you look like your floating upwards and everyone watching is wondering what’s happening?! How are you levitating like that?!

Are you that good yet?  If you are, tag me on instagram to show me that you’ve arrived. (@borntoflycurriculum  #aerialtraining)

How to use the pull-up assist bands: Hitch them around the pull-up bar. Put your feet in the loop and use them to help lift your weight as you do the pull-ups (and all their wonderful variations that you can learn in my online courses if you want). You can also use them as in warm-up by sitting on the ground underneath your bar and pulling down on the bands. This is also a great option if you’re just starting out and need less intensity on the pull-ups. This pictures below are from my aerial training program. I’m using a trapeze bar, but this could also be a pull-up bar you have at home.


IMG_1175IMG_1183IMG_1232


Home Workout Item #4: Resistance Bands

Link to set from Walmart. 

resistance band set

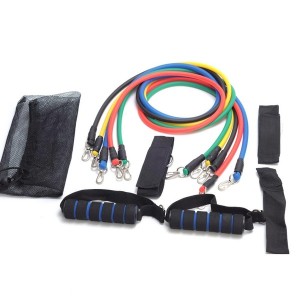
Resistance bands are a MUST when you want to target the smaller stabilizing muscles of the shoulder such as the external rotator cuff musclesThis is the training known as “pre-hab” and we do it to prevent the need for “rehab.”  I mentioned a shoulder injury at the start of this article. The thing that saved me was the fact that I have a quality set of resistance bands at home which I used prior to my injury (so it wasn’t as bad as it could have been) and used to help me regain strength post-injury (so that I rebuild proper strength to prevent any further or future injury).

Home Workout Item #5: Ankle Weights

Link to ankle weight from Best Buy.

ankle weights

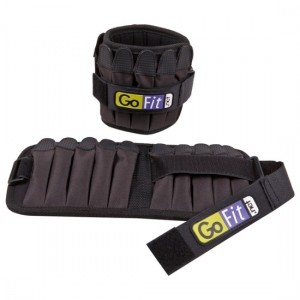
I love my ankle weights! I have a studio set so that I can send students into the air frequently with ankle weights on. When you are first starting, body-weight might be enough, but if you’re dedicated to your sport, you will soon find that you’ll need that something extra to push you to the next level.

There are so many ways that I use weights — frequently in my flexibility training as I work end range strength or to target various muscles that are hard to get with just body-weight only.  One of my favorite things about ankles weights is the feeling of weightlessness I get when I take them off. 🙂

The ankle weights pictured are for the ankle weight connoisseur. They are adjustable in weight, allowing you to adjust by taking weight rods in and out. These are the ones I have, but I typically just leave them at the max weight all the time, so probably a feature not really needed. It was a nice thought though.  

HINT: The more ankle weights you own, the less you’ll need a set of hand-held weights. Just stack up the ankle weights on your arms, wrists, etc.

Home Workout Item #6: Cardboard or Paper Plates

Yeah, a break from all the spending! I really don’t want to break the bank setting up a home workout system (I would rather you spend your money on quality aerial classes afterall), so this one is nice and cheap. Take the cardboard from one of the boxes that delivered one of the above items, and cut it up until you have nice squares that you can slide around on. These are perfect for sliding into splits for active flexibility challenges or working on your core strength in plank sliders. I use these a lot in my classes, so it’s no surprise to my students to see this item listed here!

Home Workout Item #7: Foam Roller

Link to foam roller from Walmart. 

foam roller
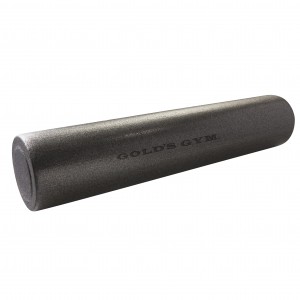
The last 4 items on my list here are for the more relaxing part of the workout that comes at the end or on days that are focused on recovery, stretching etc.  Both the foam roller and the next item — the lacrosse ball– are for myofascial release specifically, which is a form of massage that will help your body release after a tough workout or release tension or tightness in a muscle or the fascia surrounding it.

Home Workout Item #8: Lacrosse Ball

Link here. 

2230_3_1

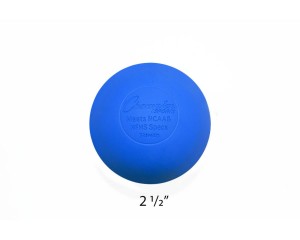
I never knew one little lacrosse ball would be such a good friend to me.  I use it all the time to rub out my pec minor especially. I have one in the car that my 4 year old son knows I will pull out whenever we are in line somewhere. He pulls it out for me and will even start rubbing it on my shoulders for me! Yes, this Mama loves her self-care time.

One of the factors that led to my last shoulder injury was an overly tight pec minor, so I have learned first-hand the difference in shoulder health that can be had from self-massage time with this tool. I use it a lot now.

Home Workout Item #9: Yoga Blocks

Link to yoga blocks. 

yoga blockIf you do yoga, you likely already have yoga blocks already.  If you’re into being flexible, you probably do some version of yoga and therefore, my first sentence still holds.  If you’re into aerial and haven’t started getting serious about your flexibility, now’s a great time to start! Incorporate into your workouts. Blocks are a great way to help access stretches in lovely ways making your body very happy while doing them.

Blocks can double as a more conditioning-type tool when you squeeze them between your knees in various challenges or lift your leg over them in hip flexor training. I find myself using blocks all the time for all sorts of reasons, so had to include them on my list!

Home Workout Item #10: Yoga Mat

For the savasana at the end of your stretching that came after your hard-core aerial workout. It’s nice to have a mat for stretching and relaxation. You earned it.


WANT TO HOME-TRAIN? First, please check with your local aerial studio to see if they are hosting online classes. It’s a great way to keep supporting your local school. They will need your support to make it through this time. If your local studio isn’t providing online classes, or you’re looking to add to your schedule, I’d be happy to have you join my local group! During the month of Coronavirus-April 2020, we are going online at AerialWorks Castle Rock with our studio classes and you’re welcome to join in the fun. Follow this link to our studio calendar. Join any class that is labeled “online” and we’ll see you on zoom!

___________________________________________

About the Author

Rebekah Leach is the author of the entire collection of beloved aerial manuals. From hoop to sling to silks and rope, she’s covering it all! Her passion is education and her fun is torturing students to become better versions of themselves. She is the founder of Born to Fly Teacher Training Programs, AerialDancing.com, and her local studio is AerialWorks Castle Rock. 


Nerve Flossing to Improve the Pike

It is an all too common occurrence. A new – or seasoned – aerialist finds themselves stuck in their flexibility journey. It seems that no matter how often and hard they stretch, no matter how many different approaches they take, their flexibility simply will not improve. Maybe it’s just the way our bones are shaped? Or maybe even our muscles are just too large? The list of possibilities goes on and on… But something that maybe you haven’t heard of yet is that your nerves might be highly involved. What does this have to do flexibility and how can we fix it? In this post, Jenn Crane of Cirque Physio discusses how to improve your nerve flexibility specifically in the hamstrings. Hamstring mobility directly impacts many of the popular flexi-positions we find ourselves in during aerial dance, such as splits and the pike.


  • Anatomy of the Posterior Thigh (The Back of Your Leg)


There is a lot going on in your posterior thigh. For the sake of simplicity, I’m going to discuss the anatomy of the two main structures that most frequently limit flexibility in your pike stretch: hamstrings and your sciatic nerve.

Hamstrings

There are three hamstring muscles (per leg) and they all originate on the bottom of your pelvis (half of one originates on the back of your thigh bone, if we’re being picky). They course down the back of your thigh, and insert on the bones of your lower leg- the top of your tibia and fibula, just below the back of your knee.

backofhamstrings

What Makes Hamstrings Stretch?

To fully stretch any muscle, you have to move the insertion away from the origin. For hamstrings specifically, this often looks like the standard forward fold/pike stretch. However, frequently in this stretch, we let our pelvis rotate downward (“tail tucked” position), which technically means you’re not fully stretching the hamstrings, because the origin is creeping towards the insertion.  To get a true hamstring stretch, the knee must be extended straight, and the pelvis must not be posteriorly tilted.

Sciatic Nerve

The next potentially pike-limiting structure of the posterior thigh is the sciatic nerve and its branches. This is the largest nerve in your body, and is about the diameter of your pinky finger. The sciatic nerve is formed from several segments of nerves exiting your spinal cord in your lower back, then it courses down behind the gluteal muscles, in between your hamstrings, and all the way under your calves and into the bottom of your feet (it branches into other nerves at several points along this course, but they’re all connected).
sciaticnerve

What Stretches the Sciatic Nerve?

Because this nerve runs from your low back to the bottom of your feet, to completely stretch this nerve, we can also be in a pike stretch- but there are several key differences with this vs the aforementioned hamstring stretch! Here’s what puts the sciatic nerve on max tension: Sitting in a pike, slouching forward (spinal flexion/tail tucked), and feet flexed.  ​​

sciaticnervestretch

  • Nerve Flossing


​Okay, so…how do you un-stick the nerve? Nerves tend to respond very well to a “gliding/flossing” action as opposed to a long hold “tensioning” action.  This means that you increase tension at one end of the nerve, and put the other end of the nerve on slack- then reverse this motion. Nerves respond better to slow rhythmic movement, and as such, you want to repeat this “gliding” pattern for multiple repetitions in one set.

This video discusses proper nerve gliding technique.


  • Nerve Mobility Exercises


For the purpose of your pike, I like to use the following sequence of events in this order:

Tissue Prep

​Sit on a hard surface (chair, panel mat, weightlifting bench) with a lacrosse ball or peanut right below where your glutes meet your hamstring, and knee bent. Start by straightening and bending your leg, and apply light pressure to the top of your thigh if you want to ramp up the intensity. Do this at three different points along your hamstring. You can also do this along your calf with your legs stretched in front of you.

Video demonstration: https://youtu.be/mgvr_NLUtvU

Nerve Flossing/Gliding

There are a lot of ways to do these, but the variation that seems to be the one that works quite well for most performing artists starts with lying on your back. First, grab behind the back of your knee and pull towards your opposite shoulder. Keep your toes pointed and straighten your leg as much as you can before you feel a slight tug – you could feel it in a few different places- hamstring, behind the knee, calf, or foot. Once you start to feel the tug, back off the stretch- bend your knee and flex your foot until you’re back in the starting position. Repeat this 10-15 times per side. ​**It is not beneficial to push into a big stretch or go to the point of pain, improving nerve mobility is not a “no pain no gain” type thing. Do not worry if your leg doesn’t straighten completely.

Video Demonstration: https://youtu.be/1zD1pTNbrhg

Active Flexibility: Bend and Snap

This is a great exercise for active hamstring flexibility. Start standing on one leg, with the other foot propped beside the standing ankle (for balance). During this whole exercise, you must keep your back straight and standing leg knee not locked out- with a very slight bend. Slowly reach forward, back straight, as far as you can go before your back bends or your hamstrings tell you to stop. Think about “booty out” the whole time. This keeps your pelvis anteriorly tilted, and ensures maximal hamstring stretch. If this is too easy, try the same thing but balancing on one leg instead of using the other leg for support. Keep your non-weight bearing foot glued to opposite ankle, don’t let it drift back.

VIdeo Demonstration: https://youtu.be/ByfhMjI0PJo


A big thanks to Jenn Crane for providing all of the material for this blog post! Dr. Jennifer Crane is a physical therapist, athletic trainer, board certified orthopedic specialist, and published author. She has been a sports medicine professional for eleven years, and has worked with a wide variety of athletes and performing artists throughout that time. In 2015, she worked as a physiotherapist living in China with the Chinese Olympic Teams in preparation for the Rio 2016 Olympics. Now, in addition to maintaining her practice in California, she works on a contractual basis with Cirque Du Soleil, as a physiotherapist in their performance medicine department. You can visit her website here – cirquephysio.com. I would highly recommend checking out her MyFLEX program if you’re looking to improve your flexibility!


Groping in the Dark Part 2: A Case for Open Gym

This is a continuation of the previous post about the important of self-practice for students. Blog by McKell Anderson.

3 – Familiarity VS Mastery

Have you ever practiced aerial to a specific playlist? To the point where when one song ends that you know what song is going to play next? Or have you ever read a passage in a book so many times that when you get a few words in that you remember what it is all about? You don’t have it memorized and can’t recite it when the book is closed, but you recognize it.

Recognizing input isn’t the same as learning and is a far cry from Mastery. Often, recognizing what is happening can make us feel like “we already know” something, and the brain turns off. How does this relate to aerial? Have you ever started watching an instructor demonstrate something you are familiar with and stopped paying as close of attention? Or have you done a warm-up or conditioning drill so many times that you think you are a pro, only to have the instructor come around and tell you to zip up your core?

When asked to do the “hip key drill” at the beginning of class, you (or your student) fan kick like a dream with perfect execution. From the ground AND from the air! Later, when lost attempting the sequence in class, the help provided is to “find the hip key again” to restart. This tip is met with wide eyes of confusion, and the instructor must offer step by step instruction to get there successfully. This would be a sign of familiarity with one entry to a hip key, but light years away from the true understanding of the wrap and how it relates to other things.

How does one get beyond familiarity and take the next step to mastery? The book addresses many ways, but one crucial thing is this: stop repeating the same drills over and over again! Mass-practice of the same exercise will not lead to mastery, just like rereading text doesn’t lead to better recall. (I wish I had known that when I was in college.) This creates a familiarity that lets you feel good about your practice when your execution is not improving to the degree that you perceive. This leads to a thought that can be haunting:
Perceiving your practice as having gone well is often a symptom of familiarity and not mastery.


4 – Variety is the Spice of Circus Life

There are things we can do to help prevent ourselves from falling into the trap of familiarity. Learning and practice should involve varied approaches. One of the most significant issues with training is that sometimes we do the SAME drills for the skills we are learning. Lack in variation diminishes our ability to establish extensive connections mentally and physically, which results in a very shallow depth of understanding.

In the book, a study that was done tested a person’s ability to throw a ball into a bucket that was three feet away. The participants were separated into two groups. Group 1 practiced throwing balls into a container that was three feet away, just like the test would require them to do. Group 2 practiced throwing balls into a container at different distances, but never the three-foot distance needed for the test. After the practices, which group performed better on the test? Group 2. Even though the first group was doing the EXACT motion that the test would measure, their execution was not as good as the group with variety in their practice.

Sarah Scribbles Comic

Thanks Sarah Andersen for the comic.

A considerable benefit of variety in training is that it develops problem-solving abilities. For any aerialist that has ever gotten stuck in the air, being able to troubleshoot is an extremely critical skill. If you have learned ten different ways to get into a hip key through variability in training, then the ability to recognize different paths to save yourself in the air is more readily at hand and in the muscle memory of the body.

This past summer I participated in the Born To Fly Teacher Training for Level 1 Silks. The week of training was very intense and sometimes a bit overwhelming. I remember us going over invert progressions for HOURS. There was a list of different drills that boggled my mind, and at the time I thought, “Do we REALLY need to do all of these?” However, when I read the section in Make It Stick about the importance of variety, I realized those invert drills are not meant to all be done together when learning how to invert but are a benefit in providing different ways to do similar things over time. The various exercises doled out bit by bit will benefit an aerialist more than the same four drills done during warm up every single week when it comes to developing inversion strength.

Some subconscious repetition I have seen with training happens when you choose where in the room you like to train and what apparatus to use. In a class, students often find their way to a specific spot in the room and never leave it. Even though six apparatuses are hanging, they never leave THE ONE. Different environmental spacing and different equipment help develop better skills. Another example from the book was when a hockey team started performing their passing drills on different areas of the ice rink in practice, and the overall cohesiveness in the gameplay improved. It seems like a no-brainer, but when we practice, we tend to all congregate to the same area we usually do. Change which points you train on in the room, try the stretchy fabric, the braided rope, the big 38” lyra, or the un-taped trapeze bar. The difference in how things feel is vital to learn.

Variety in timing is also a great tool. Not only does this help with spaced retrieval for better learning, but this also helps with execution at different energy levels. Do you always train hard skills at the beginning of practice? Just after warm up? If you only condition how to do inverts at the beginning of class, then what will happen when you need to execute one at the end of a difficult routine when your body is VERY fatigued? Choosing different times during your practice to try skills can help make you into the best aerialist you can be. Don’t be afraid to do conditioning at the end of class or training.


Open Gym Practice is a Must

To get better at anything in life, practice is a key component. We now know that what happens in class is not “practice.” That is the time that new information is going in. We need time for the brain to process and assimilate that information in our minds. After our lesson, we need to get up in the air again later to review. For a lot of aerial students, aside from the weekly classes, not much additional practice happens. This approach removes the element needed for the recall of the things done in class to make them a more permanent part of a student’s repertoire.

 Pony Poison Comic

Thanks Pony Poison for the comic.

If the studio you attend has an open gym, make sure you take the time to participate regularly. This is the time to get the things out of your head and truly learn them. Practicing A LOT is not as important as practicing effectively. Here are some tips for effective good open gym practices:

1. Do not train alone for safety and helpful group problem-solving.
2. Make open gym training follow a different pattern than standard class structure.
3. Try different conditioning exercises or try them on a new apparatus.
4. Don’t forget about your “other side.”
5. Choose to review skills that are not fresh in your mind and harder to recall.
6. Review any forgotten things low and slow before moving up.
7. Try to connect skills, even if you fail.
8. Let yourself get frustrated, but don’t fall apart over it.
9. Do not let someone teach you something new; this is remembering time!
10. Write down any questions or things you couldn’t figure out for your instructor.

To clarify, I don’t think there is anything wrong with skill sharing (item #9), but that when it comes to learning retention, using open gym for skill sharing undermines our goal. The whole point is to add training time around the need for retrieval of skills without an instructor there to make it too easy. Plan additional training opportunities for skill sharing.
For studios and instructors, open gym is often a sensitive topic. Rules need to be established to make this type of practice a safe environment and not a liability risk. Here are some suggestions for ensuring that happens:

1. Have staff members present for supervision and emergencies, not instruction.
2. Require crash pad use for all apparatuses in open gym.
3. Wait to lower in equipment (or however your studio brings them out) until after enough time or warm up has elapsed.
4. Create a designated cell phone area that is not directly next to an apparatus but close enough for filming.
5. Display a list of any open gym restricted skills.
6. Provide “open gym homework” during regular weekly classes.
7. Ensure class time incorporates training on troubleshooting when stuck.
8. Pull apparatuses up (or however your studio puts them away) before open gym is over to provide cool down time without aerial temptations.

Many of these things are commonly part of studio open gym rules. I would encourage studios to designate a cell phone area for the sake that watching a video and immediately hopping onto an apparatus to do it isn’t a long-term learning skill. The student should have at least a little walk to forget and must recall the video content. Also, it is appropriate to decide dangerous skills are too risky for open practice environments without the appropriate instructor. Teachers providing homework can help encourage open gym attendance.

While taking time to practice skills away from an instructor can be scary and overwhelming, for the teacher as much as the student, studies show this learning strategy is sound. Ensure your learning methods are prepared to support a way for information to go into your mind and a way of getting that information back out. Without this balance, the frustration of forgetting will be your enemy instead of your guide.


McKell Anderson is currently working as Rebekah Leach’s right hand woman, creating blogs, fun newsletters, photo editing, and doing all the good stuff to make this curriculum project an aerial dream-come-true.