Last year, I started the first ever online Aerial Nerd Conference (2020). It was a roaring success! I was thrilled at some of the feedback received such as from these three aerialists:
“My aerial knowledge & embodiment have grown dramatically over the two weeks of this conference. Taxonomy is a huge piece to rounding out aerial work for me. Thanks to Rebekah’s guidance, I am breaking apart common moments on sling to discover exactly what is happening. This allows me to find unexpected pathways into & out of positions. The movement (which has always been my interest) can now be my focus rather than simply the vehicle to get to the next ‘cool pose’. I am also, having a great time playing with retrogrades. I find that using retrograde when working on something new really helps me find the pathways in the new movement.” ~ Chris
“The taxonomy stuff blew my mind! It changed the way I think about aerial and teaching. It inspired me to explore more, put fun back in training foundations, and has my brain working in new ways to inspire my students. I’m actually currently on a break from teaching but now I’m ready to go back!” ~ Tawnya
“It is truly a STUNNING workshop series so far! All that I could hope to geek out over, so much that I’m having trouble sleeping at night because I keep thinking of possible sequences. Super big awesome thanks for doing this conference online. The WHYS of aerial have always been my favorite part, and you give voice to some things I never had the ability to clearly categorize in the past. It’s freaking fantastic.” ~ Kristina
One of the most popular workshops was my “What the Heck is Aerial Taxonomy?!” which gave an introduction to my wild theories and the way that I view the world of aerial. This year, I have decided to include the stuff in that workshop HERE for you, so that everyone can get a taste of what’s going on in my brain.
First video below goes over the BIG PICTURE of how I break down the different components of my aerial classes. It’s about 8 minutes and includes a whiteboard because I love organizing things in visual form. 🙂
The second video gives an in-depth example of some aerial taxonomy. It’s about 13 minutes and includes another whiteboard because I still love organizing things in visual form. This is the kind of things you can expect to do in all my TAXONOMY workshops. This is grit of it, then we discuss how it can be applied and what fun new finds pop out because of the analysis, but it starts with the pen and paper grunt work.
Like I said in the videos, I work with aerial in many different ways. I love training, I love the artistry, but what I truly thrive upon is the brain component — the part that requires you to sit and think hard. The part where you compare and contrast and make new discoveries. I love leading students into these discoveries.
I hope you can join me for an upcoming workshop and get ready to explode your brain!
It is an all too common occurrence. A new – or seasoned – aerialist finds themselves stuck in their flexibility journey. It seems that no matter how often and hard they stretch, no matter how many different approaches they take, their flexibility simply will not improve. Maybe it’s just the way our bones are shaped? Or maybe even our muscles are just too large? The list of possibilities goes on and on… But something that maybe you haven’t heard of yet is that your nerves might be highly involved. What does this have to do flexibility and how can we fix it? In this post, Jenn Crane of Cirque Physio discusses how to improve your nerve flexibility specifically in the hamstrings. Hamstring mobility directly impacts many of the popular flexi-positions we find ourselves in during aerial dance, such as splits and the pike.
Anatomy of the Posterior Thigh (The Back of Your Leg)
There is a lot going on in your posterior thigh. For the sake of simplicity, I’m going to discuss the anatomy of the two main structures that most frequently limit flexibility in your pike stretch: hamstrings and your sciatic nerve.
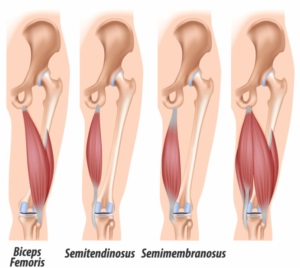
Hamstrings
There are three hamstring muscles (per leg) and they all originate on the bottom of your pelvis (half of one originates on the back of your thigh bone, if we’re being picky). They course down the back of your thigh, and insert on the bones of your lower leg- the top of your tibia and fibula, just below the back of your knee.
What Makes Hamstrings Stretch?
To fully stretch any muscle, you have to move the insertion away from the origin. For hamstrings specifically, this often looks like the standard forward fold/pike stretch. However, frequently in this stretch, we let our pelvis rotate downward (“tail tucked” position), which technically means you’re not fully stretching the hamstrings, because the origin is creeping towards the insertion. To get a true hamstring stretch, the knee must be extended straight, and the pelvis must not be posteriorly tilted.
Sciatic Nerve
The next potentially pike-limiting structure of the posterior thigh is the sciatic nerve and its branches. This is the largest nerve in your body, and is about the diameter of your pinky finger. The sciatic nerve is formed from several segments of nerves exiting your spinal cord in your lower back, then it courses down behind the gluteal muscles, in between your hamstrings, and all the way under your calves and into the bottom of your feet (it branches into other nerves at several points along this course, but they’re all connected).
What Stretches the Sciatic Nerve?
Because this nerve runs from your low back to the bottom of your feet, to completely stretch this nerve, we can also be in a pike stretch- but there are several key differences with this vs the aforementioned hamstring stretch! Here’s what puts the sciatic nerve on max tension: Sitting in a pike, slouching forward (spinal flexion/tail tucked), and feet flexed.
Nerve Flossing
Okay, so…how do you un-stick the nerve? Nerves tend to respond very well to a “gliding/flossing” action as opposed to a long hold “tensioning” action. This means that you increase tension at one end of the nerve, and put the other end of the nerve on slack- then reverse this motion. Nerves respond better to slow rhythmic movement, and as such, you want to repeat this “gliding” pattern for multiple repetitions in one set.
This video discusses proper nerve gliding technique.
Nerve Mobility Exercises
For the purpose of your pike, I like to use the following sequence of events in this order:
Tissue Prep
Sit on a hard surface (chair, panel mat, weightlifting bench) with a lacrosse ball or peanut right below where your glutes meet your hamstring, and knee bent. Start by straightening and bending your leg, and apply light pressure to the top of your thigh if you want to ramp up the intensity. Do this at three different points along your hamstring. You can also do this along your calf with your legs stretched in front of you.
There are a lot of ways to do these, but the variation that seems to be the one that works quite well for most performing artists starts with lying on your back. First, grab behind the back of your knee and pull towards your opposite shoulder. Keep your toes pointed and straighten your leg as much as you can before you feel a slight tug – you could feel it in a few different places- hamstring, behind the knee, calf, or foot. Once you start to feel the tug, back off the stretch- bend your knee and flex your foot until you’re back in the starting position. Repeat this 10-15 times per side. **It is not beneficial to push into a big stretch or go to the point of pain, improving nerve mobility is not a “no pain no gain” type thing. Do not worry if your leg doesn’t straighten completely.
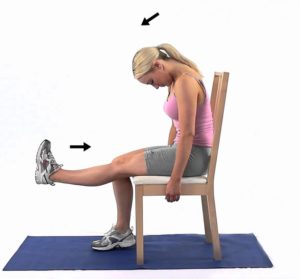
This is a great exercise for active hamstring flexibility. Start standing on one leg, with the other foot propped beside the standing ankle (for balance). During this whole exercise, you must keep your back straight and standing leg knee not locked out- with a very slight bend. Slowly reach forward, back straight, as far as you can go before your back bends or your hamstrings tell you to stop. Think about “booty out” the whole time. This keeps your pelvis anteriorly tilted, and ensures maximal hamstring stretch. If this is too easy, try the same thing but balancing on one leg instead of using the other leg for support. Keep your non-weight bearing foot glued to opposite ankle, don’t let it drift back.
A big thanks to Jenn Crane for providing all of the material for this blog post! Dr. Jennifer Craneis a physical therapist, athletic trainer, board certified orthopedic specialist, and published author. She has been a sports medicine professional for eleven years, and has worked with a wide variety of athletes and performing artists throughout that time. In 2015, she worked as a physiotherapist living in China with the Chinese Olympic Teams in preparation for the Rio 2016 Olympics. Now, in addition to maintaining her practice in California, she works on a contractual basis withCirque Du Soleil, as a physiotherapist in their performance medicine department. You can visit her website here – cirquephysio.com. I would highly recommend checking out her MyFLEX program if you’re looking to improve your flexibility!
Authored by Dr. Jennifer Crane, PT, DPT, OCS, ATC of Cirque Physio.
What does current performing arts culture tell us about muscle soreness? Aches and pains? Bruises, burns, and rope rash?
“CIRCUS HURTS.”
“Train through it.”
“Tears are for home, not circus”
“Here, have some circus candy (advil/ibuprofen).”
These are all common “circus-isms” that I’ve heard, and I want to talk a bit about soreness- is it productive? How much is too much? How do you train optimally while simultaneously avoiding OVERtraining and subsequent injury?
This is a HUUUGEE topic, and I’m only going to address a small component of it in this post.
I was recently reading an article on implementing pitch counts in little league players (woah, #notcircus?! I know…what was I thinking…) and it REALLY got my gears turning. Not because I love baseball (…I don’t), but because one of the criteria they used for progressing pitch intensity and frequency was something I felt could also be applied to circus artists who are returning to training after a long hiatus, or even to those who are wanting to progress skill and strength levels in an efficient amount of time, without getting injured.
THE SORENESS RULE
This criteria for training progression is referred to as the “Soreness rule.” It was initially created for pitchers, but has since been adapted and modified to fit other sports as well (running, weight lifting, etc). These rules give athletes the ability to modify their progression of skill/strength according to the soreness they experience. If the athlete feels sore, tender, or stiff, then they can use the soreness rules to guide their training for the rest of that week.
BUT FIRST…
Here are the ground rules before I dive into WHAT the actual soreness rules are:
THESE DON’T APPLY IF YOU’RE INJURED. If you have pain that is NOT from working out a muscle, GET IT CHECKED OUT by someone who’s qualified to do so.
These rules are based on stepwise progression of overall training volume, strength or skill acquisition. This means that before you get started, you need to create multiple steps/phases of training- whether its breaking a trick down into 5 phases, or just generally increasing the number of hours you train per week. For example: if you’re an aerialist that is coming back from having a baby (and have been cleared to return to aerial by all involved healthcare providers), you should first sit down and create a multi-phase return-to-full-time-aerial plan. This must be well defined, so work with a qualified coach to do so, if you get stuck!
Ok, sit down for this one…I’m serious, you’re not going to like it. EACH TRAINING DAY SHOULD HAVE ONE DAY OF REST BETWEEN to ensure proper recovery and adaptation to the stimulus and load!!
Yeah, I said it. The “R” word. In this context, it doesn’t mean complete Netflix and chill bedrest status for 24 hours, it just means that if you’re working on an upper body skill, to give your upper body a break the next day. Yes, handstands count. Yes, contortion counts. Yes, vinyasa yoga counts. Yes, one day = 24 hours.
Each step/phase in your progression should last for at least one week. This means that you should be working on whatever conditioning/training drills comprise ONE step for SEVEN DAYS- without soreness. You must be able to do step one, completely free of any muscle soreness, for 7 days before progressing to step 2. If you have soreness during step one, you stay on step 1 (with 24 hour break between each training session) until you’re doing it WITHOUT soreness. For 7 days.
I do realize I just said the exact same thing three times. I’ve had the rest day conversation with enough circus artists to know that repetition is key, and over-defining each term is required. It is also often required for me to define how many hours are in a day, and how many days are in a week.
CLIFF NOTES VERSION
Overwhelmed? Here’s the cliff notes version: Pick a skill to work on, or an overall training goal. Break the goal down into at least 5 steps. Assign drills and conditioning for each step. Start with step 1, and don’t move on to step 2 until you’ve been doing it every other day for one week, without any muscle soreness.
Oh yeah…one more thing. WORK WITH A QUALIFIED COACH.
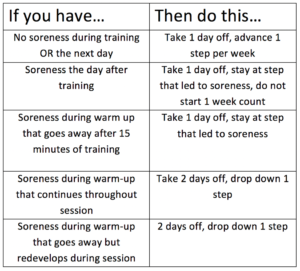
PRESENTING: THE SORENESS RULE
YOU’VE GOTTA BE KIDDING ME.
Alright, there we have it. The rules. You guys, I KNOW. Your heart rate and blood pressure just spiked, and you’re getting anxious just THINKING about all those rest days, and how slowly you think you’ll progress. I’m aware that in the circus world, these rules seem SUPER conservative.
However…as a circus PT, at least 80% of the injuries I treat are from overuse…too much training, and too little rest. These injuries tend to last upwards of 3 months (because again, no rest…) and can significantly impact performing artists career length and career quality. The kicker is, these injuries are caused predominantly by modifiable risk factors…aka, proper dosage of training and adequate rest. So yes…I understand that you’re panicking thinking about this. And yes, I understand that implementing any big change in training program is something that does NOT happen overnight, but I think these rules have a potentially huge positive impact on the overall rate of overuse injuries in circus artists, and I think there’s value to planting this seed in your minds…even if you don’t actually DO anything about it for a while!
As I said, the topic of adequate rest, proper training load and volume, as well as overall periodization of training in circus arts is a MASSIVE subject. I’ll likely have a few more posts on this topic, so if you have any specific requests, leave them in the comment section!
Dr. Jennifer Crane is a physical therapist, athletic trainer, board certified orthopedic specialist, and published author. She has been a sports medicine professional for eight years, and has worked with a wide variety of athletes and performing artists throughout that time. Most recently, she worked as a physiotherapist living in China with the Chinese Olympic Teams in preparation for the Rio 2016 Olympics. While in China, she worked with multiple sports teams: diving, weight-lifting, fencing, gymnastics, synchronized swimming, and track and field. Of the athletes she worked with, 18 of them went on to get an Olympic gold medal in Rio.
Now happily back in San Francisco, Jen’s practice is based at Circus Center, where she specializes in injury prevention and treatment of athletes and performing artists. When she’s not working with circus artists, she can usually be found standing on her hands, swinging on flying trapeze, or spinning on a single point trapeze.